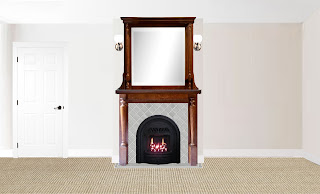
As with in our master bedroom, we are also installing a custom fireplace in the living room. We are in the process. The first contractor we hired was really difficult to work with and quit mid-project, leaving us with a half-job. So, we still need to build and install the mantel and overmantel. The process has been quite the nightmare which I won't bore you with, but I'm very unimpressed with Mendota as well (the fireplace manufacturer). We now have a MUCH better contractor, Shane Chuning, who pays attention to detail and doesn't mind working with home-owners like myself to whom detail is very important. We plan to install wood flooring and a built-in daybed in the bay window. We had Shane pull out the gigantic drywalled bookshelves (I hope I can find some before pictures of that) and will replace them with pretty built-in furniture style shelves similar to the ones I built in the library. We (well, Shane's guy, Mark) FINALLY painted over the hideous flesh colored paint we have lived with for over a decade with a more soothing creamy white. Mark is a hard worker. That was ALOT of painting. Again, we custom ordered the handmade tile for the fireplace, which turned out GORGEOUS. We also had Shane raise the arch (so that my tall husband and sons don't hit their heads on it anymore) and add a faux beam he made by hand over the bay window. Photos are limited again (I'm the worst), but here is what I have thus far:
Tuesday, April 18, 2023
Living Room
Master Bedroom
While we have been remodeling our master en suite, we have slowly been plugging away at the bedroom as well. Again, I don't really have any before pictures. But, we installed a faux beam over the window seat and added walnut window sills that are gorgeous. We are in the process of adding a custom fireplace and building out the window seat to be more functional and visually appealing. The fireplace will have an overmantel mirror that is a special mirror that hides the tv when not in use and that allows the picture to show through when the tv I turned on. I also had some handmade tiles made for the fireplace surround which turned out gorgeous. I will add more pictures as I get a chance to take more, but here are some pictures in the mean time of what is going on, including the fireplace design:
Entryway
We are getting the entryway under way. Of course, I forgot to take before pictures again. After more than a decade of living with the hideous "flesh-colored" paint, we FINALLY painted the walls the creamy white I like (and by "we", I mean my contractor's right-hand man, Mark). We will be renovating the whole staircase and removing the carpet to make way for wood with a runner. Our contractor, Shane Chuning, installed gorgeous faux beams he built and finished by hand out of alder. Stay tuned for more pictures of the entryway and stairs as we make more progress.
Finally settled on a light fixture. I knew the style I wanted but couldn't find it in the size and finish I wanted. So, I purchased this one in a brass finish (which was actually a very pretty finish and would have matched my raw brass sconces I made perfectly, but I wanted to keep things cohesive with all my ceiling fixtures being a dark bronze finish), and I disassembled it and spray painted it with a Rustoleum bronze paint. My body was exhausted from balancing while installing it (my husband was sick that day and my kids were otherwise engaged so I didn't have any extra hands to help me), but it turned out gorgeous! If I were to shop for one again, I would save myself the time and hassle of trying to find the right finish and just get the perfect light and paint it. It took way less time to paint it than it took searching for the perfect light in the finish I wanted. Not sure why I didn't think of it sooner, as that is how I updated the ceiling fans in the kids' bedrooms years ago. Live and learn . . . . I will take this lesson with me as I search for my dining room and library lights.
The scale and height of the fixture works perfectly for the tall, narrow entryway/stairwell. It looks beautiful in the day with the light off as well.
Once we remodel the balustrade/stairway and find the perfect pot for the entryway tree that we want to grow in here, then, it will just be down to adding artwork and such. Stay tuned.


