Monday, February 6, 2012

I was a Busy Little Elf this Christmas

My second post of designing and making these nativities can be seen here: http://amasterofnone.blogspot.com/2010/12/christmas-crafts-wooden-puzzle-nativity.html

If you choose to make one of my nativities for yourself or as a gift, I would really appreciate it if you would include with it an acknowledgement that it is "from [or 'adapted from' if you make any changes] the original design by Jennifer E. Norton as found on her blog, http://amasterofnone.blogspot.com".  I put alot of my time, thought, and heart into my design of this nativity and the symbolism behind each individual piece and how they are arranged.  I would really appreciate your willingness to acknowledge my original design. Thank you.

Remember last year when I made that wooden nativity for my friend.  Well, this year, for Christmas, I decided to make nativities for all my family members.  It was a ton of work (I think I spent around 55hours), but everyone seemed to really like them, so it was worth it.  I wanted to make a nativity that could be set up in a traditional manner or as a puzzle.  But, more importantly, I wanted it to be symbolic.  So that everyone could understand the meaning behind my design, I included the following letter with each nativity.  The anticipation of giving people this labor of love made this Christmas particularly exciting for me.  It was so much fun.  I made three oak nativities and the rest are pine.  Here is the explanation letter and some pictures of the process and final products.  Enjoy!


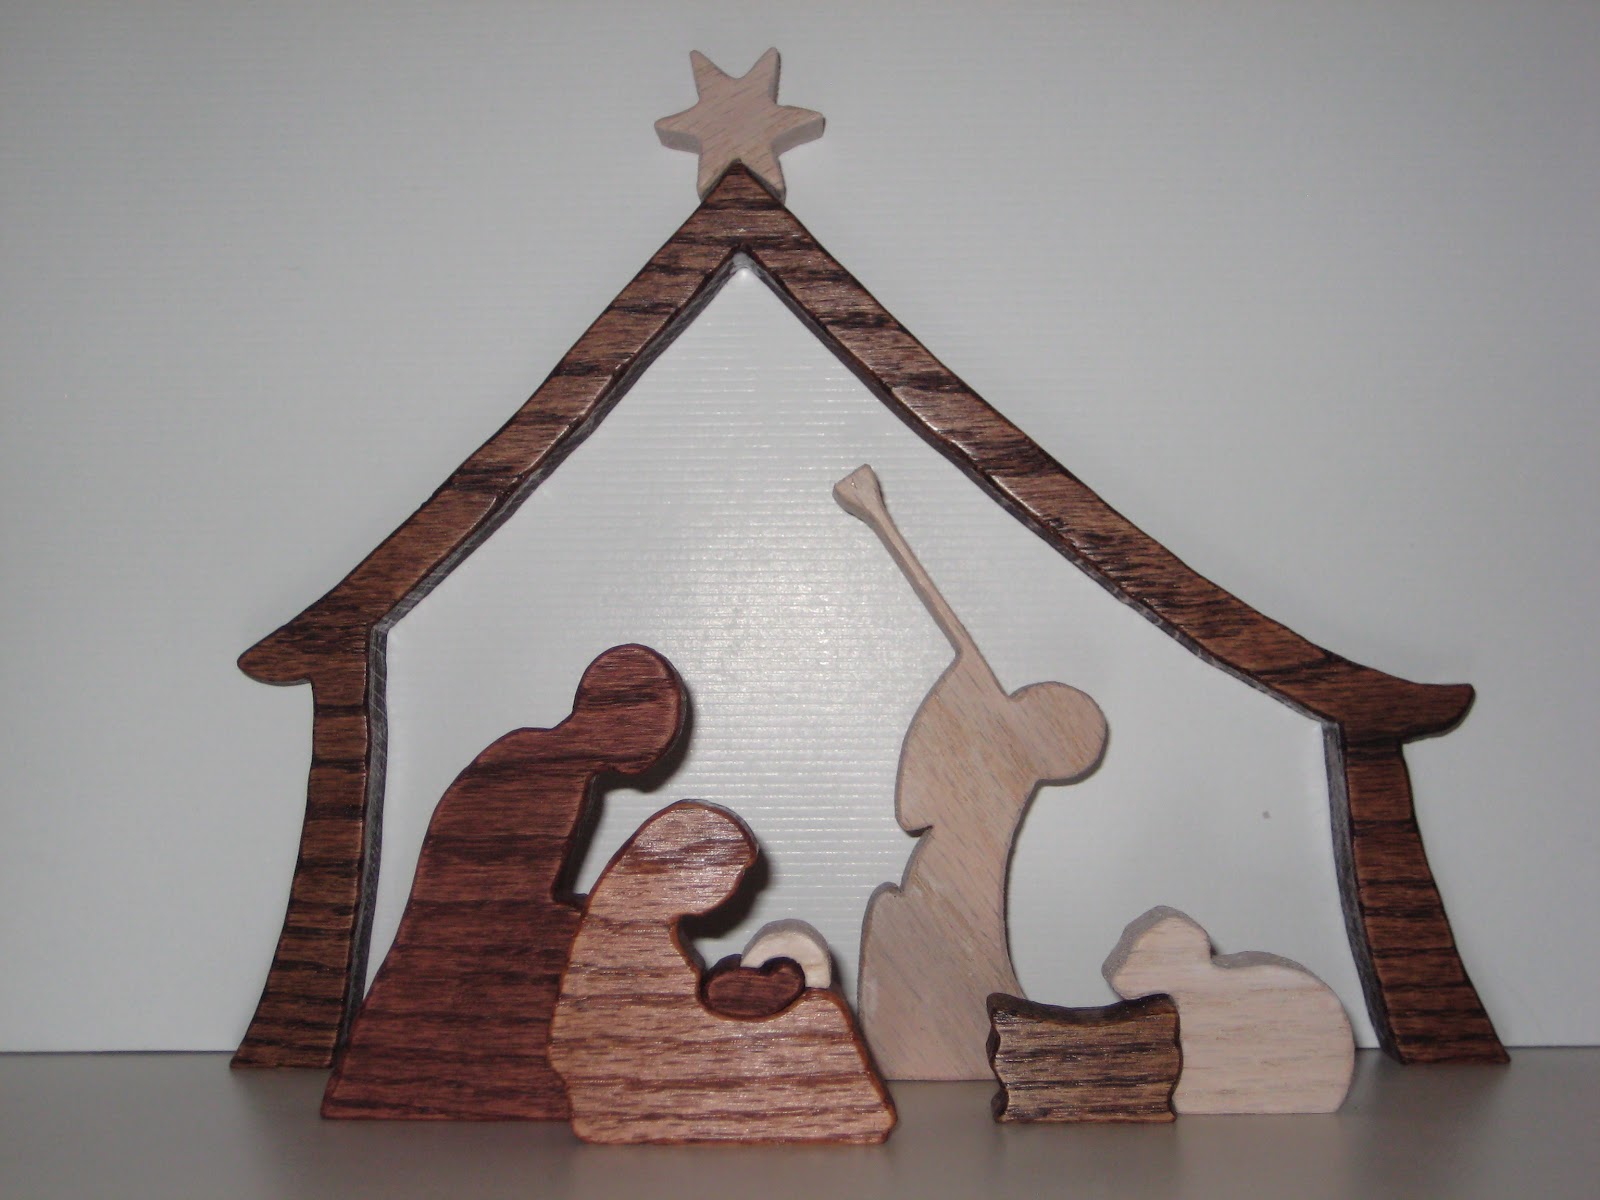
My favorite Christmas decoration is the nativity.  I love the various nativities and the creativity that goes into each artist’s unique rendition of their own vision of that sacred night.  But, for a long time, I have wanted to create a nativity of my own.  I was very particular about which characters to include in the scene, as I wanted it to be a depiction of the actual moment of our Savior’s birth and for the pieces to also be symbolic of not only Christ’s physical birth, but of His place in God’s Plan of Salvation as well.  I assume that Mary, Joseph, and the stable animals were the only mortals present for the actual birth, but that they were supported and surrounded by heavenly hosts of angels heralding the moment of our Savior’s birth as well.  So, these are the characters I chose to include.  I left out the shepherds and wisemen, as they arrived after the birth.
·        The Star of David not only casts light down upon the nativity as a beacon of light to which the shepherds and wisemen were able to turn in order to find the Christchild, but also represents the fact that Christ is our own constant beacon of light to which we must turn in order to find happiness and ultimately receive salvation as we find our own way to Christ.
·        The Lamb not only represents the humble circumstances of our Savior’s birth among the livestock, but also the fact that this was the birth of the “Lamb of God,” of our “Good Shepherd”. 
·        The manger is formed to hold the feed for the lamb and other livestock, as is the purpose of a manger, or to hold the baby, Jesus, as his humble “cradle”.  It represents the humble circumstances of our earthly life relative to the eternal life we will one day enjoy. 
·        Joseph, Christ’s earthly father, kneels behind Mary, supporting her through the pain and suffering of the birthing process, and rejoicing with her as her hard work is rewarded with the arrival of this precious infant.  This is a representation of our Father in Heaven, who supports us through the pain and suffering we face throughout our lives as He awaits our return to Him when He may rejoice with us as our hard work here on earth is rewarded in heaven.
·        Mary, a labored mother, sits in the reclined position as she holds her new little infant whom she has just delivered.  She represents love—both atoning love and earthly love.  Just as she sacrificed her body in its suffering to carry and deliver this baby, giving him life, so did Christ sacrifice His body, suffering as he atoned to give us spiritual life.   Mary holds her new little infant before placing him in the manger so that she may rest, representing the love of our earthly parents, who spend their lifetime working tirelessly to love and support us before leaving us to receive their own eternal rest. 
·        The Christchild is centered in the scene to represent that centering our lives on Christ is the only way to achieve ultimate happiness.
·         Although the nativity can be set up in a traditional manner, with the star atop the stable, the angel kneeling near the holy family, and the baby in the manger, it’s Puzzle Form symbolizes God’s beautiful orchestration of both our earthly lives and the overall plan of salvation as He perfectly aligns all the pieces to fit together into one exquisite whole.
Each Christmas season, we hope that this nativity will remind you of the true reason for the season, as both a celebration of Christ’s birth and a representation of His purpose in our lives.  We love you all so dearly. 
In the Process (I should had taken some pictures of myself while cutting and sanding with sawdust everywhere and sporting face mask, goggles, and ear protection.  I was really a sight to behold.)
The Finished Nativities

Oak
Pine
Oak Popped


Pine Popped
Oak Mary Holding Baby
Pine Mary Holding Baby

Oak Baby in Manger


Pine Baby in Manger


Tuesday, December 14, 2010

Cristmas Creations--Stockings were Hung

I made a couple more stockings today to replace the original red and green ones I made.  It's been slow-going making stockings to match my gold, copper, bronze, brown, and white color scheme, as those colors seem to be hard to come by in velvet.  I'm going to have to find some copper-colored velvet before next Christmas so I can make a matching stocking for the new baby.  Yikes.

Pocket Slings

So, my sister-in-law put together a boutique in order to raise money to adopt a little boy from Ethiopia.  So, I donated some baby slings to her boutique to sell.  I first received one as a gift from a very talented friend in Las Vegas, when I was pregnant with my first baby.  Since that time, I have slowly adapted her design to create basically the same sling, only on a much smaller scale and with fabric that breaths well (to keep me and my baby cool in the summer).  I first added a pocket to the original design so I could fold up the sling into it's own pocket for easier transportation of the sling when not in use and to hold things while I use the sling (like my keys and wallet and pacifiers, diapers, wipes, etc.).  I have since experimented with different fabrics and rings until I have come up with this "pocket sling".  I call it a pocket sling because (1) it has that pocket it folds into that can also be used to carry pacifiers, diapers, etc. while the sling is in use and (2) because it folds up small enough to fit in a loose pocket, or (more realistically) in your purse or diaper bag.  It's still the original 2 yards of fabric, but fold up very small and uses small 2" bone rings to secure it.  I use my own pocket sling all the time and keep in in the car, as I don't personally carry a purse.  But, when I have a newborn again, I will keep another in my diaper bag.  They are so convenient for not only carrying your baby, without having to lug around a bluky baby backpack, frontpack, or stroller, but also seem to work well as a quick blanket alternative when you have a sleepy baby away from home (as they are easily as big as a blankie when unfolded (and if you make yours out of the same fabric as your baby's favorite blankie, they fill that roll even better).  Anyway, here's s few pictures of some of the slings I've made so you can see how to make one for yourself.  Tricot and nylon lining fabric both seem to work great as they are soft to the touch, fold up small, keep the baby cool in the summer, and fit nicely through the 2" bone rings.  The sling can be used with newborns, infants, or toddlers--just adjust the tension to fit.  They also can be worn like a front pack, back pack, or on your hip, whichever is most comfortable.  They really are so versatile--make yourself one if you have little ones at home!


Pocketed Sling with quarter for size reference:
Unfolded Sling with quarter for size reference:
Sling secured in rings and ready to wear with quarter for size reference:
Close up of how the rings secure the sling:
My lovely sister-in-law modeling one of the slings with my 2 year old Jesse in tow (Jesse loves the sling and rides in one daily on our morning family walls):


Monday, December 13, 2010

Christmas Creations--Bakugan Boards

For the older boys' Christmas presents this year, I wanted to make them metal boards to display their Bakugans on since they always want Bajugan stuff and we just can't afford any this year.  So, this is what I came up with in the end.  To make the boards, I took a piece of sheet metal and folded the edges over using vice grips and a hammer (it would have been WAY easier and smoother too if I had metal seamers to use, but sadly I don't).  Before hammering down the final edge, I folded the ribbon into it so it could hang from the ribbon.  Then, I found the Bakugan logo online and used photoshop to change "Bakugan" to say "Natugan" for Nathan's board and "Bakuben" for Ben's board.  Then, I cut out the logos and modge-podged them onto the boards.  Overall, I think they will do, though I'm glad the boys won't be as critical as I am.  If they use them alot, then I may buy a couple magnetic wire mesh baskets for their birthdays to add to the boards to hold Bakugan cards.

Saturday, December 11, 2010

Christmas Creations--Christmas Tree Ornaments

When we got our first Christmas tree, we were so poor that after buying a rather ugly fresh tree, we couldn't afford any ornaments.  So, the tradition began to make our own ornaments.  After 9 years of marriage, we still get together as a family every year to make ornaments for our tree.  It's a great tradition that reminds us of where we have come from and how blessed we have been.  We make a new type of ornament each year along with ornaments of our favorite pictures from throughout the year.

The first few years, our tree looked rather bare, but after all this time, it has finally been filled enough that we figure we could use a bigger tree.  All our ornaments are homemade, with the exception of the pretty globe ornaments that my mom and sister got us to really carry our color theme.  Anyway, I thought I would share some of the ornaments we have made throughout the years, in case any of you like to make ornaments with your family.  Of course, they are much prettier and more brilliant in real life, but I can't capture the way they catch the light in photos.  Oh well, these will have to do.


Beaded Stars:


Wired Stars:


Glittered Globes:


Beaded Trees:


Picture Ornaments (we do a block for each kid that allows us to use 6 of our favorite photos of that child from the year):


Friday, December 10, 2010

Christmas Creations--Ducklings Pull Toy

This year, for Jesse's Christmas present, I made a pull toy.  If you want to make one of your own, it's basically the same steps as you will find in the Puzzle Nativity Post.  I ordered the wheels and axles online, as I don't have the tools to make them, but you could make your own.  If I do another one, I think I'll use suede cord instead of ribbon, as the ribbon seems to get twisted up too easily when you pick the whole thing up.  But, I think it should still work fine, even if the ribbon is twisted.  I guess I'll have to wait and see until Jesse has a go at it to make sure it withstands the abuse of children, but Ben tried it out and it seemed to work out great for him.  I'm excited:  I think Jesse is going to LOVE it!

Christmas Creations--Wooden Puzzle Nativity

My second post about these nativities I designed and made can be seen here: http://amasterofnone.blogspot.com/2012/02/i-was-busy-little-elf-this-christmas.html

If you choose to make one of my nativities for yourself or as a gift, I would really appreciate it if you would include with it an acknowledgement that it is "from [or 'adapted from' if you make any changes] the original design by Jennifer E. Norton as found on her blog, http://amasterofnone.blogspot.com".  I put alot of my time, thought, and heart into my design of this nativity and the symbolism behind each individual piece and how they are arranged.  I would really appreciate your willingness to acknowledge my original design. Thank you.
 
So, I've been wanting to come up with something like this for a while, so here's my first attempt. I was really mad when I accidentally stained two of the pieces opposite to what I had intended (I had meant for the background below the star to be brighter/lighter than that above the star). But, overall, I think it turned out pretty good for my first project. I made this one as a gift for a good friend, but I will definitely want to make one for our family next year, as Cam, Nathan, and Ben have all asked me too.

It can be set up flat . . . .
Popped . . . .
Or as a traditional nativity with Mary holding the baby, or the baby in the manger . . . .

Overall, I'm pleased with the results.  If you want to make one yourself, design something to your liking on paper and then transfer your drawing to wood (I used 1" oak and white washed the lighter pieces to look more like pine) . . . .
Then, using a scroll saw cut the pieces out (I found it easiest to use a spiral blade). . . .
Then sand the pieces so they are smooth and the edges are soft (I used a palm sander and fine tooth paper) . . . .
Then stain and polyurethane each piece the color that you want (be careful not to accidentally stain the wrong piece the wrong color like I did).  And wala!  You have yourself a nativity . . . .