Labels

Showing posts with label Electrical Work. Show all posts

Sunday, December 27, 2020

Playroom - a Family Project for Christmas


This Christmas we decided we need to get rid of stuff instead of buying new stuff.  So we decided as a family to clear out our storage room and turn it into a playroom. All seven of the kids and my husband all helped out.  In fact, he actually did pretty much all of the traditional Christmas stuff that I'm always in charge of because I was too busy with the project.  He is the best husband ever! We worked all week and even on Christmas eve to finish it. We also did some other building that day: we built healthier gingerbread houses with Graham crackers and cream cheese frosting and berries. They were delicious. I highly recommend using fruit over candy! 

Anyway, I am so disappointed that I didn't think to take a before picture,  but imagine a VERY full room filled with shelves stuffed full of storage and the small floor area that remains is taken up by a bed that barely fits in there so you have to crawl into it from the foot of the bed.  That is what our storage room was. It was bad - really bad. Since the goal was to avoid buying stuff,  we reused the lumber from the shelves to build more decorative toy storage and a playhouse. It turned out SO cute!

The playhouse opens up to the space under the stairs and we added a little "dog house" under the lowest part of the stairs for the animals pull-toys (but it is big enough for the kids to have fun playing inside there as well so I may add a light later on).  Of course, the one stud bay we chose to add the door in had an electrical wire running through it, so we added 2 junctions on either side (one outlet inside the playhouse and a porchlight on the outside).  We added a doorbell, that the kids love to push over and over (even though we haven't had time to build the door yet).  We used plexiglass for the windows so they would be safer in the play area than glass.  We had planned to paint the "siding" but it looked so good natural that we left it.  I had already built the window boxes out of natural wood so they blend in but I might want to paint them later. They look better in real life than in the picture with their fake lambs ear and boxwood.  And, because our area of the country doesn't readily sell cedar shingles, my husband suggested we use shims, which look really good too.  He's so smart!  And, we put in a foam flooring mats that look surprisingly good (like wood flooring) that we bought from WeSellMats.  They look quite good and feel really good to walk on.

We ran out of time before completing the project so I will be adding pictures as we add more to the room.  Like I mentioned, we still need to add a little dutch door to the playhouse.  We also have a little mailbox to add to the playhouse, climbing wall hand-holds and plywood to add a climbing wall, gymnastic rings and a hammock chair to hang from the ceiling, and open shelving to hang above the toy shelves to display all our wooden toys.  Down the road, we are planning to add a stage as well for all the costumes and puppets.  But, apparently, projects go much slower when you are doing them with little kids than they do when you are alone.  Imagine that!  Haha!


 UPDATE:
The kids begged me to add the mailbox, which I have now added.  It looks pretty cute and they are having a blast "sending" letters to each other.  The double bracket detail happened by happy accident.  I accidentally bought a too small bracket initially which is why I couldn't install the mailbox on Christmas Eve.  Then, once I bought the bigger bracket, I felt like you couldn't really see it so I added the smaller one on top.  We don't all agree on if it should be there but I think it looks nice and allows you to see more contrast and detail, so I'm going to keep it:


Only took me a year to get around to building the dutch door for the playhouse.  My 7 year old begged me all year to build it, so I finally got around to it while I was building the doors for our master closet and installed it for his 8th birthday.  The kids are thrilled!


Sunday, June 28, 2020

Sports Shed

So my shop (garage) and my husband's garden shed had been taken over by our large family's (family of 9) sport and camping equipment.  Being that wood working is my hobby and gardening is my husband's hobby, this had become a major problem.  So, we built another shed dedicated to Sporting Gear.  And when I say "we built" I mean we ordered a custom shed that was built wrong and then rebuilt and still isn't right.  But, we are out of patience and decided to just finish it off anyway. 


First off, if you decide to buy a paint sprayer, make sure you get a good one.  I bought a cheap one and it was extremely labor-intensive to use and literally burned my hands because it ran so hot.  Instead of saving me time and effort, it was MUCH more difficult and time-consuming to use than a brush and roller.  It took me three 10-hour days to paint a single coat of primer and a single coat of paint!  Ridiculous!  Second, let me just warn you, if you ever get an inkling to stencil your floor with three colors of paint to make it beautiful, don't!, especially if it is just a shed floor!  For this 10'x10' shed, I had to stencil 81 squares and it took me an hour to do only four (ya, I'm not a very fast stenciler).  The floor looks gorgeous, but it wasn't worth the time investment.  Consider yourself forewarned.  :)


I took a wooden step ladder and used a grinder to cut out the rivets that were holding it together so I could use the ladder side as a rolling ladder.  I installed black iron pipe along the fronts of the loft and the opposing shelf and then installed upside down wall hooks on the back of the ladder at the heights of both the pipe rails to hook it over so that it can be used for the loft or for the shelf above the door.  Then, I installed fixed casters at the bottom of the ladder so it can be rolled side-to-side easily.  It is light weight so easy to move from one shelf to the next and rolls out of the way to access things.


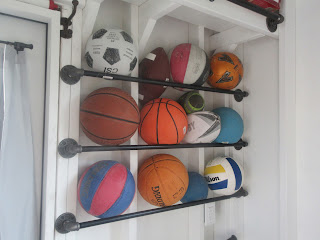
 The black pipe worked so well as ladder rail that I decided to use it for storage of our sports equipment as well.  It works excellent as a ball rack, a racket rack, a baseball bat rack, a hockey stick rack, and even as a roller blade/skate rack!


The ladder rails also work well as clothing bars for hanging our life jackets and wetsuits!

The BB Guns hang above the door which is fun.

The bikes fit below the shelf that sits below the loft, with helmets hanging on hooks above.  The shelf holds camping gear, while the loft holds the kayaks, snowboards, skis, sleds, kites, etc.  I haven't had a chance yet, but I will hang hooks on the wall behind the bikes so they can store upright on their back wheels as well, which will increase our floor space as well.


I still need to install some more shelves in the wall space above the cleat/shoe rack to make the bins of mits, balls, frisbes, safety gear, jump ropes, etc. more easily accessible.


All-in-all, the shed turned out really cute and also stores our gear very efficiently and effectively.  It is very functional as well as aesthetically pleasing, so I'm happy.  AND!  I have my garage back for my workshop and my husband has his garden shed again!  Now, I just need to help him make his shed pretty and functional again too.  :)


Update:  we added a nice little doorstep to the shed with our leftover decking material.  Turned out pretty!

Monday, August 24, 2015

Library Study

So, it's finally begun.  This year has been so busy that I haven't had time to start building the library, even though I had cut all the lumber for it months ago.  But, I have finally buckled down and begun.  I will update as I make progress, but here's how it has progressed so far.

BEFORE
BEFORE

BEFORE

BEFORE
Remember that last summer I added a window:
Hole cut for window

Adding window

Window installed
Now, I am working on installing the library:
Door Bookshelves Rough-In

Adjustable shelves in place in Rough-In

Window Bookshelf Rough-In in progress

Cap Shelves added to Window Bookshelves Rough-In

Boys get impatient and start adding books to the Rough-In.  Stereo bookshelves begin.

Still gotta live, even though it's a construction zone.

Children's Bookshelves Rough-In added

Stereo Bookshelves Rough-In Up so I can now listen to music while I work.
The stereo side is set off the wall to allow space behind for wires to stay out of sight. I moved the light switch from the wall to the side of the bookshelves by the door.  I also added an outlet with USB ports for a charging station and wired for the light fixtures that will be on the front of the bookshelves and for the outlets that will be on the front of the base trim.  I also ran hard wire to the deck area so we now have a speaker zone out there as well, since we spend most of the year living out back.

This week, I'm working on the face trim.  More pics to come . . . .


UPDATE:  Sorry with all the traveling birthdays, weddings, etc., this project has continued to be slow-going.  I have finally added the face- and end-trim bit have not yet installed the crown or base trim.  I need to make some final decisions on the light fixtures so I can order those parts and install the lights before I finish up.  Then I can start staining!
Since the last pictures I have:
-Cut, routed, and installed the face trim
-Cut, routed, and installed the end trim
-Trimmed out the window and doorway
-Built and installed the charging dock
-Routed the front edge of all the shelves.

Here's what it's looking like now:
Hoping to find a small sofa for where the chairs are and some nice chairs for where the old ratty sofa is.
Removable charging station

Close-up of routed shelf edge
UPDATE:  Working on adding the base moulding.  You can't tell in these pictures, but I have the grain all lined up around the corners so that it looks good once it is stained.


Next, I need to work on building the doors for the lower section of the bookshelves. . . .


UPDATE:  Got the doors cut, fitted, routed, and glued-up.  They are now sitting in place, though they don't have any hinges yet.


Now onto the lights . . . .


UPDATE:  Lights are done
First time I've ever order parts to assemble my own light fixtures.  I have since ordered some new parts to tweak them a little, but I won't be able to reassemble them until the new parts come.  These are all sold cast brass, so they are heavy duty and shoudl last as long as or longer than the house itself.
Let there be light.  Worked late into the night with a headlamp to get these babies installed.


Now onto the crown moulding and window sill . . . .


UPDATE:  Crown moulding is in.  Window sill is cut and routed and sitting in place.  I won't install it until I decide if I want to take the time and energy to do something fancier with the trim below the window.


I'm sick so I will be taking a break. Next, I need to stain everything, work on wall trim for the rest of the room, build the desk wall, and wallpaper or paint (or do both to) the walls.  I also need to find a small sofa to fit under the window:  I have a feeling that this will be my favorite room to lounge in this winter . . . .