Tuesday, March 27, 2012

Cheap Hardware Make-over

So, our house is full of brass hardware.  I am NOT a fan of brass.  And, incidentally, brass is not "in" right now either so it gives the house a dated look.  But, hardware is EXPENSIVE!  So, I decided to try a little updating on the cheap.  I spray-painted all the hardware with Rustoleum Oil-rubbed bronze primer/spray-paint in one.  I figured I had nothing to lose.  And, I am so pleased.  It has held up really well and looks SO much better.  It looks much more upscale now and complements the nickel fixtures instead of clashing with them like the brass did.  The only hardware I actually changed were the builder's grade outdoor light fixtures.  Everything else was done with paint.  You would never know they used to be brass.  And, it has been months now and they are still holding up well.  I figure I can touch them up if I need to in the future, but, so far the only one's that need any touch-ups are the ones my three-year-old got to before they were totally dry.  In order to paint everything, I removed it all, cleaned it with wet-wipes, scuffed it with steel wool, and wiped it down with a microfiber tack cloth before spray painting.  I would like to do all the hinges as well, but since the previous owner painted them all, it will be such a big job to strip the paint, it may  be a while before I get the courage to tackle that project.  (UPDATE:  I am working on the hinges for each room as I do the rooms individually--turns out it's not a bad as I thought--just boil the hinges in baking soda and water--using an old pan you don't use for food--and the paint comes right off!) Anyway, here are some before and after pictures.  I don't have really good before since I didn't take any and just had to use what I could find after-the-fact.

BEFORE


  AFTER


Bathroom Vanity and Sink

So, my boys' bathroom was very awkward.  The vanity sink stuck out so far into the room that it blocked the door, crowded the flow of traffic, and scared you with its daunting corner when you tried to sit on the toilet.  It also was only big enough for one person to use at a time.  Not good.  But, it was a standard-sized vanity.  And, there simply aren't vanities (or sinks) narrow enough for the space (except expensive euro-style vanities/sinks, which still would only accommodate one person at a time).  So, I decided to make one myself.  I bought an acacia wood tray to use for the sink.  I built everything else with the cheapest pine boards and 2x4s at the hardware store.  I added bail pulls on the ends to hold hand towels and put a long mirror above the vanity so all four boys can use it at once.  I finished the sink and vanity top with Waterlox to protect them from the water.  I finished the shelves with polyurethane (a less expensive finish) to protect them from water.  I found that the grid-style drains simply do not have enough venting to drain properly, so I jery-rigged the overflow drain that came with the faucet to work in a no-overflow sink.  In the end, I am very pleased with the results.  The bathroom feels so much more open now and has plenty of space for all four boys to use at once.

 Crowded Bathroom BEFORE


Vanity


Bathroom AFTER

(I switched the towel bar out for hooks that are easier for little boys to use)


Friday, March 9, 2012

Knife Block Drawer Organizer

Today I made this knife block drawer organizer.  I was tired of having a messy drawer of knives.  Not only is it inconvenient, but it's also dangerous.  It turned out pretty well.  I made one cut 1/8" off by accident.  That, consequently, threw everything else off so that I could not maintain uniform spacing and still have the block function properly.  So, that was very frustrating.  I had planned to sand it down more and oil it and make it all beautiful, but after the frustration of the wrong cut, I gave up and threw it in the knife drawer to start using it.  It's still quite pretty and, being that it's in the drawer, I don't care that it's not perfect.  If it bugs me, I can go back and touch it up later.  It seems to function really well, which pleases me.  It holds all my knives, with a little room to spare and still leave enough space for my other cutting utensils (e.g., egg slicer, apple corer/slicer, french fry slicer, can opener, rasp grater, peelers, garlic press, etc.)  It's so much nicer than it was before when everything was just thrown in the drawer.  And, the drawer is right below a built-in cutting board--bonus points for that.  Overall, I'm pleased with the end result but this project cost me just enough time and sanity to make it worth it to me to just buy one in the future, even though they cost a small fortune.

Thursday, March 8, 2012

Pot and Pan Lid Cupboard Rack


No more cramping my style--or my space!  So, I was getting sick of the inefficiency in trying to store the pot and pan lids in my kitchen.  There's really no good way to do it.  So, I thought, there must be some sort of cupboard organizer for this problem--I can't be the only person in the world that this drives crazy.  So, after a little research, I found a bamboo rack that had good reviews.  But, to fill my cupboard, it would have cost $20.  I showed it to Cam and he said, couldn't you just build that?  Sure enough it looked super simple.  So, a trip to the hardware store for some dowels (<$5) and using some scrap wood I had on had, I threw this thing together.  For about a half hour of my time and $15 savings, I got this new custom rack for my cupboard.  I love it already.  It's in the perfect location.  I can grab a lid without having to leave the stove.  So, I look at it as I got paid $30/hour to make it.  Not bad, not bad at all.  :)

Today I'm tackling the knife drawer problem (and danger for that matter).  Will post the results soon!

Tuesday, February 7, 2012

For my Tiger-Lover

So, my third son LOVES tigers.  He has BEEN a tiger for about 7 months now.  He loves everything about tigers.  I've never seen a kid THIS consumed with a single thing.  He was a tiger for Halloween.  We were walking through JoAnn's a couple weeks before Halloween.  After walking down an aisle, we turned the corner, but our 2 year old did not come with us.  Then, all of a sudden, we hear an excited exclamation:  first a gasp of excitement, then "I LOVE this!!!!"  I've never had a kid say that about anything, let alone a 2 year old in a fabric and craft store, so naturally we all rushed back into the the aisle to see what he was looking at.  He was holding a . . . wait for it . . . a pair of tiger ears.  This was one of those times (o.k., probably the only time) that I couldn't resist buying an unnecessary "toy" for my kid when there was no special occasion to do so.  Is that sad?  I don't know, but I knew that those few dollars would bring endless amounts of fun, and they did.  For Halloween, I picked up a tiger tail and pinned it to his pants and painted his face.  Who would think that a two-year-old could sit still long enough to have his face painted?  But, he was SO excited to look like a tiger that he held perfectly still while I painted his face.  When it was time to wash his face that night, he was so reluctant to do so.  It was truly remarkable.

So, come Christmas time, he was still Tiger-Enthused, so it was only natural that most of his Christmas gifts this year revolved around tigers.  Since I make a toy for each of my boys for Christmas every year, this year I made the traditional "flipper toy" for my number three, since he didn't have one yet.  And, of course, it HAD to be a tiger.  After making it, I was a little concerned that he may grow out of his tiger-phase before Christmas hit, but, fortunately, he didn't.  In fact, he's still a tiger, going into Valentines!  Anyway, I forgot to get pictures of it before, and the baby has gotten ahold of it since and left his teeth marks in it's face, but here are some pictures and video of it anyway.  Enjoy!

My Little Tiger

About half the time, he added these tiger teeth to his costume.


Marionettes

This year for Christmas, I made marionettes for Nathan and Ben.  I made a T-Rex and a Beetle.  First, I drew out patterns until I was satisfied.  Then, I transferred the drawings to 1x pine boards with carbon paper.  Then, I cut the pieces with my scroll saw and sanded down all the edges.  Then I attached the pieces to each other with rope and hung the marionettes with fishing line.  If I make more in the future, I will make larger handles on top.  I made small handles, because I thought that would be easier for small hands.  But, it turns out that, in practice, the smaller the handles the larger the movement required to get the same effect.  So, in essence, small handles make it more difficult for small hands to move the marionettes--especially the beetle, as it has 6 legs.  Though, I am pleased that the T-Rex moves with the side-to-side sway that i was hoping to give it.  The kids can still play with them, but they would have been much easier if the handles were bigger.  I learned my lesson.  Maybe if I find extra time some day I will replace the handles on these with larger ones.  I will definitely make future marionettes with larger handles.  Here are some pictures and videos of the marionettes.


Monday, February 6, 2012

I was a Busy Little Elf this Christmas

My second post of designing and making these nativities can be seen here: http://amasterofnone.blogspot.com/2010/12/christmas-crafts-wooden-puzzle-nativity.html

If you choose to make one of my nativities for yourself or as a gift, I would really appreciate it if you would include with it an acknowledgement that it is "from [or 'adapted from' if you make any changes] the original design by Jennifer E. Norton as found on her blog, http://amasterofnone.blogspot.com".  I put alot of my time, thought, and heart into my design of this nativity and the symbolism behind each individual piece and how they are arranged.  I would really appreciate your willingness to acknowledge my original design. Thank you.

Remember last year when I made that wooden nativity for my friend.  Well, this year, for Christmas, I decided to make nativities for all my family members.  It was a ton of work (I think I spent around 55hours), but everyone seemed to really like them, so it was worth it.  I wanted to make a nativity that could be set up in a traditional manner or as a puzzle.  But, more importantly, I wanted it to be symbolic.  So that everyone could understand the meaning behind my design, I included the following letter with each nativity.  The anticipation of giving people this labor of love made this Christmas particularly exciting for me.  It was so much fun.  I made three oak nativities and the rest are pine.  Here is the explanation letter and some pictures of the process and final products.  Enjoy!


My favorite Christmas decoration is the nativity.  I love the various nativities and the creativity that goes into each artist’s unique rendition of their own vision of that sacred night.  But, for a long time, I have wanted to create a nativity of my own.  I was very particular about which characters to include in the scene, as I wanted it to be a depiction of the actual moment of our Savior’s birth and for the pieces to also be symbolic of not only Christ’s physical birth, but of His place in God’s Plan of Salvation as well.  I assume that Mary, Joseph, and the stable animals were the only mortals present for the actual birth, but that they were supported and surrounded by heavenly hosts of angels heralding the moment of our Savior’s birth as well.  So, these are the characters I chose to include.  I left out the shepherds and wisemen, as they arrived after the birth.
·        The Star of David not only casts light down upon the nativity as a beacon of light to which the shepherds and wisemen were able to turn in order to find the Christchild, but also represents the fact that Christ is our own constant beacon of light to which we must turn in order to find happiness and ultimately receive salvation as we find our own way to Christ.
·        The Lamb not only represents the humble circumstances of our Savior’s birth among the livestock, but also the fact that this was the birth of the “Lamb of God,” of our “Good Shepherd”. 
·        The manger is formed to hold the feed for the lamb and other livestock, as is the purpose of a manger, or to hold the baby, Jesus, as his humble “cradle”.  It represents the humble circumstances of our earthly life relative to the eternal life we will one day enjoy. 
·        Joseph, Christ’s earthly father, kneels behind Mary, supporting her through the pain and suffering of the birthing process, and rejoicing with her as her hard work is rewarded with the arrival of this precious infant.  This is a representation of our Father in Heaven, who supports us through the pain and suffering we face throughout our lives as He awaits our return to Him when He may rejoice with us as our hard work here on earth is rewarded in heaven.
·        Mary, a labored mother, sits in the reclined position as she holds her new little infant whom she has just delivered.  She represents love—both atoning love and earthly love.  Just as she sacrificed her body in its suffering to carry and deliver this baby, giving him life, so did Christ sacrifice His body, suffering as he atoned to give us spiritual life.   Mary holds her new little infant before placing him in the manger so that she may rest, representing the love of our earthly parents, who spend their lifetime working tirelessly to love and support us before leaving us to receive their own eternal rest. 
·        The Christchild is centered in the scene to represent that centering our lives on Christ is the only way to achieve ultimate happiness.
·         Although the nativity can be set up in a traditional manner, with the star atop the stable, the angel kneeling near the holy family, and the baby in the manger, it’s Puzzle Form symbolizes God’s beautiful orchestration of both our earthly lives and the overall plan of salvation as He perfectly aligns all the pieces to fit together into one exquisite whole.
Each Christmas season, we hope that this nativity will remind you of the true reason for the season, as both a celebration of Christ’s birth and a representation of His purpose in our lives.  We love you all so dearly. 
In the Process (I should had taken some pictures of myself while cutting and sanding with sawdust everywhere and sporting face mask, goggles, and ear protection.  I was really a sight to behold.)
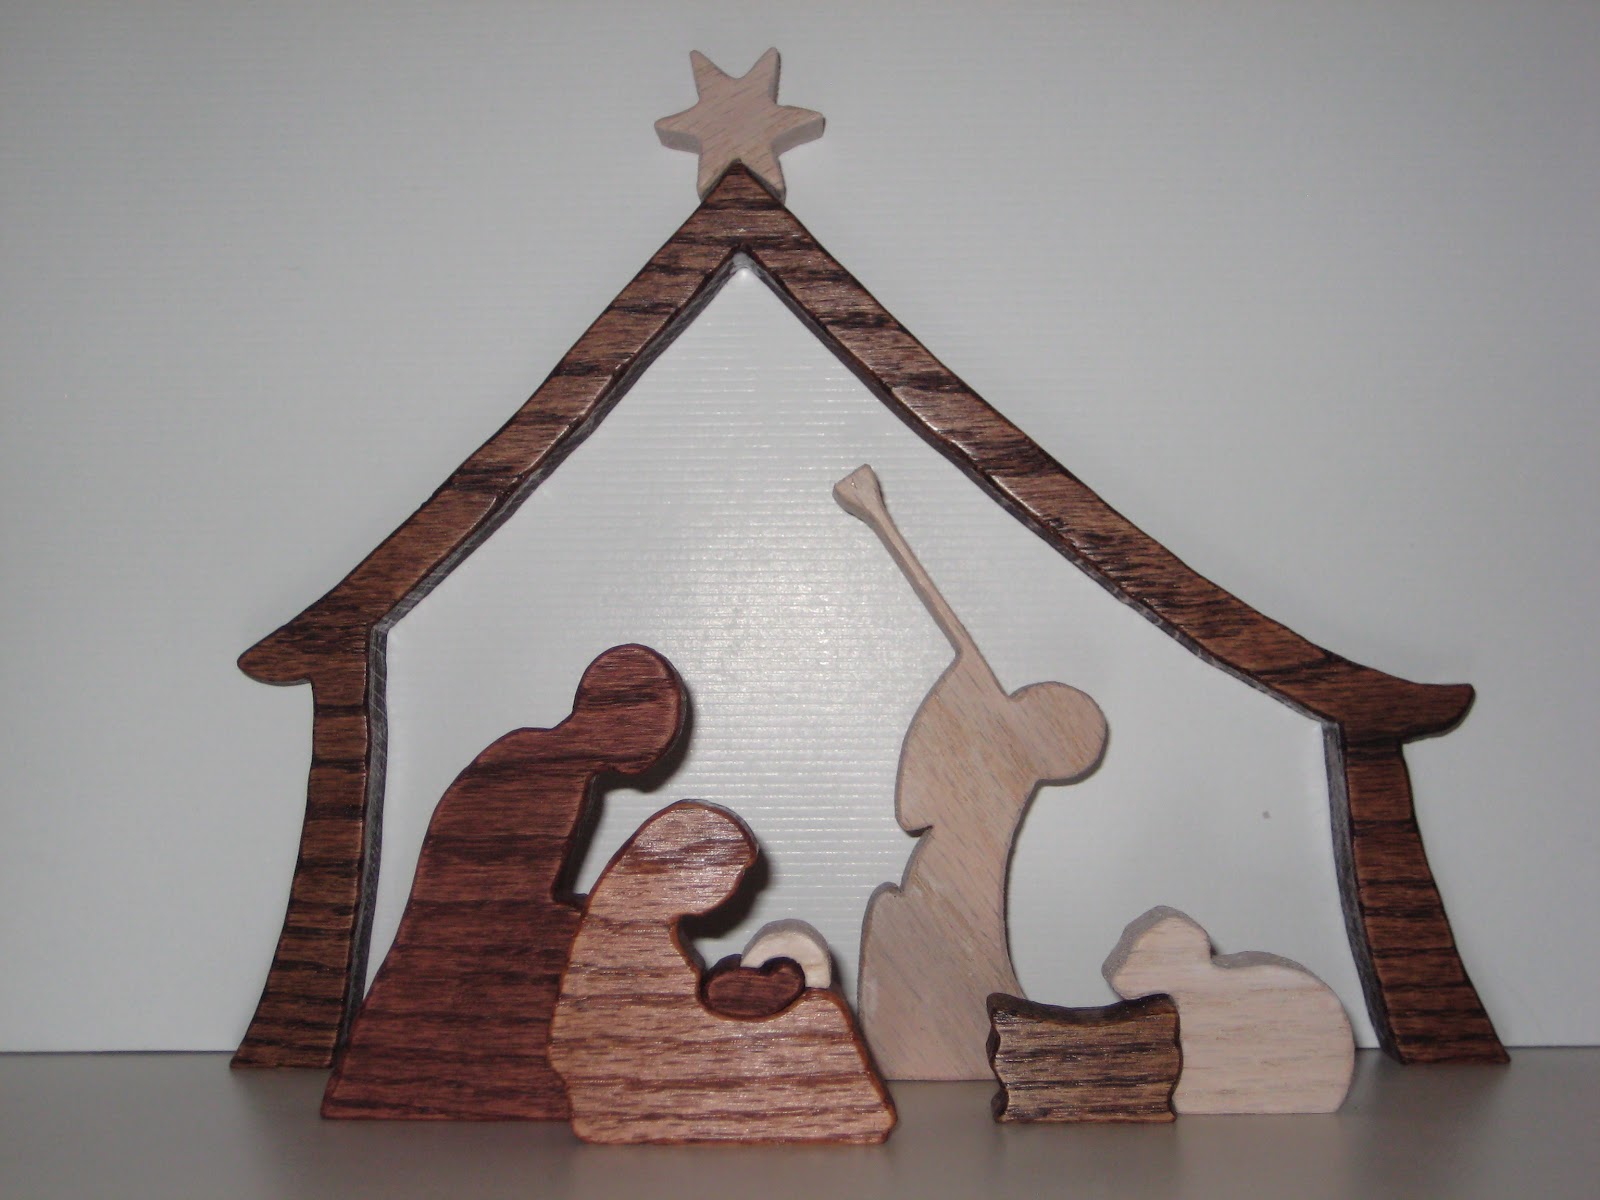
The Finished Nativities

Oak
Pine
Oak Popped


Pine Popped
Oak Mary Holding Baby
Pine Mary Holding Baby

Oak Baby in Manger


Pine Baby in Manger