Tuesday, March 27, 2012

Cheap Hardware Make-over

So, our house is full of brass hardware.  I am NOT a fan of brass.  And, incidentally, brass is not "in" right now either so it gives the house a dated look.  But, hardware is EXPENSIVE!  So, I decided to try a little updating on the cheap.  I spray-painted all the hardware with Rustoleum Oil-rubbed bronze primer/spray-paint in one.  I figured I had nothing to lose.  And, I am so pleased.  It has held up really well and looks SO much better.  It looks much more upscale now and complements the nickel fixtures instead of clashing with them like the brass did.  The only hardware I actually changed were the builder's grade outdoor light fixtures.  Everything else was done with paint.  You would never know they used to be brass.  And, it has been months now and they are still holding up well.  I figure I can touch them up if I need to in the future, but, so far the only one's that need any touch-ups are the ones my three-year-old got to before they were totally dry.  In order to paint everything, I removed it all, cleaned it with wet-wipes, scuffed it with steel wool, and wiped it down with a microfiber tack cloth before spray painting.  I would like to do all the hinges as well, but since the previous owner painted them all, it will be such a big job to strip the paint, it may  be a while before I get the courage to tackle that project.  (UPDATE:  I am working on the hinges for each room as I do the rooms individually--turns out it's not a bad as I thought--just boil the hinges in baking soda and water--using an old pan you don't use for food--and the paint comes right off!) Anyway, here are some before and after pictures.  I don't have really good before since I didn't take any and just had to use what I could find after-the-fact.

BEFORE


  AFTER


Bathroom Vanity and Sink

So, my boys' bathroom was very awkward.  The vanity sink stuck out so far into the room that it blocked the door, crowded the flow of traffic, and scared you with its daunting corner when you tried to sit on the toilet.  It also was only big enough for one person to use at a time.  Not good.  But, it was a standard-sized vanity.  And, there simply aren't vanities (or sinks) narrow enough for the space (except expensive euro-style vanities/sinks, which still would only accommodate one person at a time).  So, I decided to make one myself.  I bought an acacia wood tray to use for the sink.  I built everything else with the cheapest pine boards and 2x4s at the hardware store.  I added bail pulls on the ends to hold hand towels and put a long mirror above the vanity so all four boys can use it at once.  I finished the sink and vanity top with Waterlox to protect them from the water.  I finished the shelves with polyurethane (a less expensive finish) to protect them from water.  I found that the grid-style drains simply do not have enough venting to drain properly, so I jery-rigged the overflow drain that came with the faucet to work in a no-overflow sink.  In the end, I am very pleased with the results.  The bathroom feels so much more open now and has plenty of space for all four boys to use at once.

 Crowded Bathroom BEFORE


Vanity


Bathroom AFTER

(I switched the towel bar out for hooks that are easier for little boys to use)


Friday, March 9, 2012

Knife Block Drawer Organizer

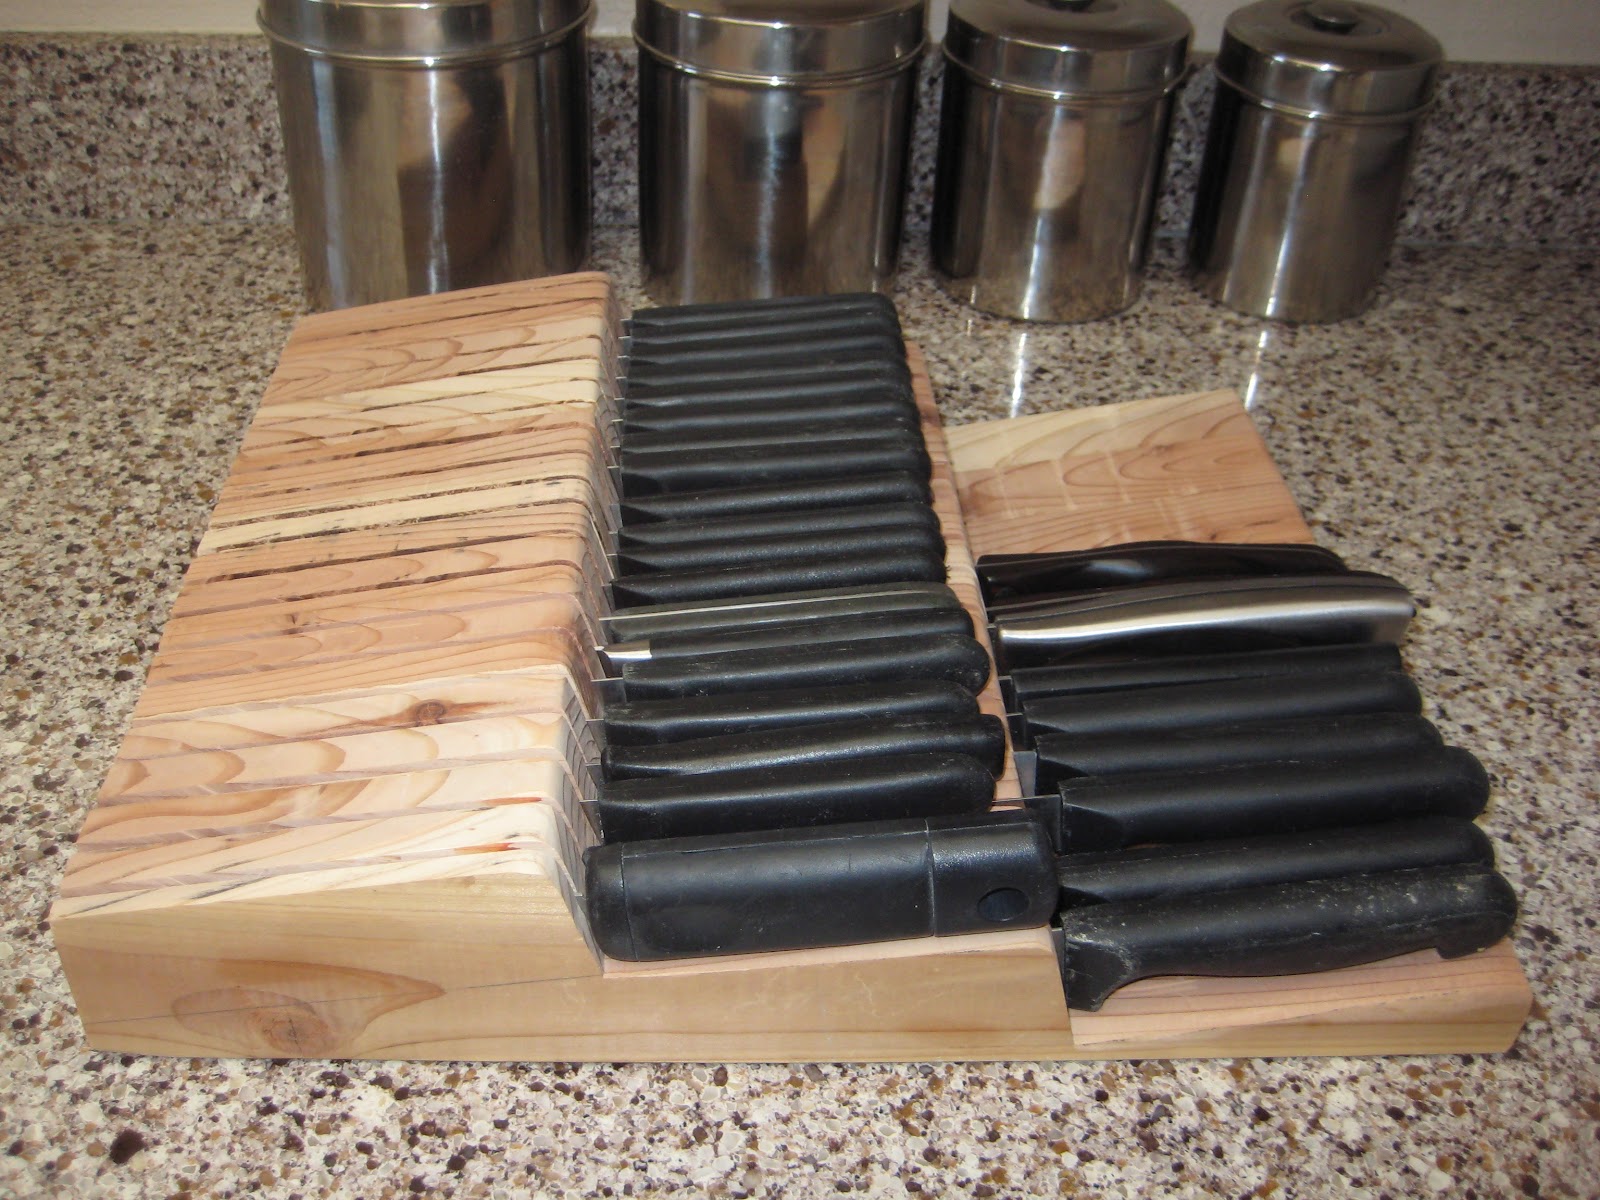
Today I made this knife block drawer organizer.  I was tired of having a messy drawer of knives.  Not only is it inconvenient, but it's also dangerous.  It turned out pretty well.  I made one cut 1/8" off by accident.  That, consequently, threw everything else off so that I could not maintain uniform spacing and still have the block function properly.  So, that was very frustrating.  I had planned to sand it down more and oil it and make it all beautiful, but after the frustration of the wrong cut, I gave up and threw it in the knife drawer to start using it.  It's still quite pretty and, being that it's in the drawer, I don't care that it's not perfect.  If it bugs me, I can go back and touch it up later.  It seems to function really well, which pleases me.  It holds all my knives, with a little room to spare and still leave enough space for my other cutting utensils (e.g., egg slicer, apple corer/slicer, french fry slicer, can opener, rasp grater, peelers, garlic press, etc.)  It's so much nicer than it was before when everything was just thrown in the drawer.  And, the drawer is right below a built-in cutting board--bonus points for that.  Overall, I'm pleased with the end result but this project cost me just enough time and sanity to make it worth it to me to just buy one in the future, even though they cost a small fortune.

Thursday, March 8, 2012

Pot and Pan Lid Cupboard Rack


No more cramping my style--or my space!  So, I was getting sick of the inefficiency in trying to store the pot and pan lids in my kitchen.  There's really no good way to do it.  So, I thought, there must be some sort of cupboard organizer for this problem--I can't be the only person in the world that this drives crazy.  So, after a little research, I found a bamboo rack that had good reviews.  But, to fill my cupboard, it would have cost $20.  I showed it to Cam and he said, couldn't you just build that?  Sure enough it looked super simple.  So, a trip to the hardware store for some dowels (<$5) and using some scrap wood I had on had, I threw this thing together.  For about a half hour of my time and $15 savings, I got this new custom rack for my cupboard.  I love it already.  It's in the perfect location.  I can grab a lid without having to leave the stove.  So, I look at it as I got paid $30/hour to make it.  Not bad, not bad at all.  :)

Today I'm tackling the knife drawer problem (and danger for that matter).  Will post the results soon!